Adapting Speakeasy MCP Servers for Remote Deployment
Speakeasy-generated MCP servers are designed to run locally using Node.js, but they can be adapted into remote services using MCP’s Streamable HTTP transport specification . This adaptation unlocks several key advantages:
- Simplified deployment: Users don’t need Node.js, npm, or other local tooling installed
- Flexible hosting: Deploy to any cloud provider, container platform, or server infrastructure
- Distribution independence: Eliminate reliance on npm registries for server distribution
- Multi-client support: Handle concurrent connections from multiple MCP clients
This guide demonstrates how to prepare a Speakeasy-generated MCP server for cloud deployment by wrapping it in an HTTP framework like Express.js, enabling it to serve multiple clients simultaneously over standard HTTP connections.
Prerequisites
Before starting, readers will need the following:
Testing the MCP Server Locally
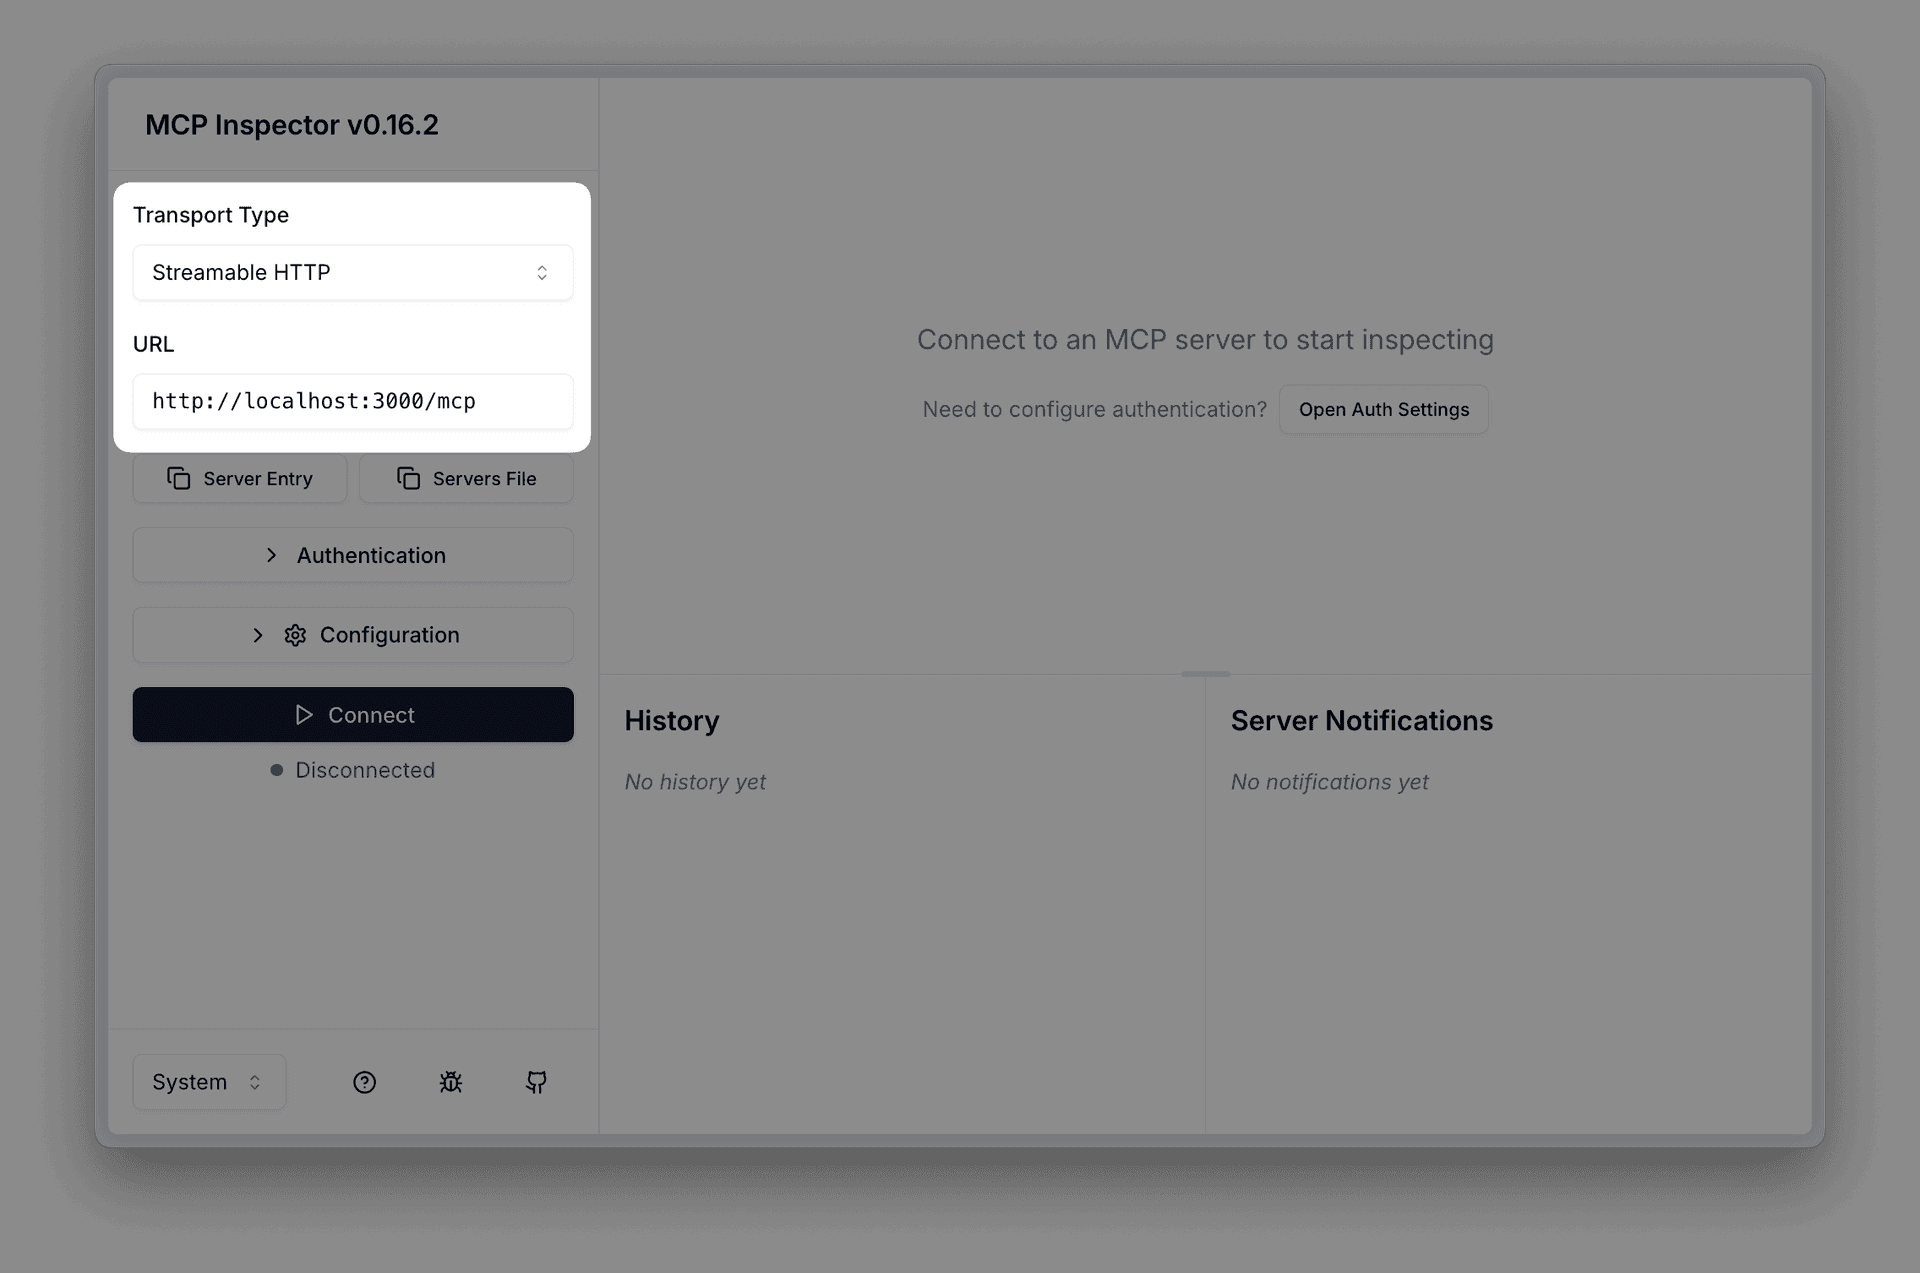
While working on the MCP server, take advantage of the MCP Inspector to test your work locally.
First, run the inspector with the following command:
npx @modelcontextprotocol/inspectorOnce the inspector is running, set the transport to “Streamable HTTP” and the
URL to the address of the local MCP endpoint, which is
http://localhost:3000/mcp in this tutorial. This will allow you to connect to
the MCP server and verify it’s working correctly before deployment.
Preparing the HTTP Server
From a terminal, navigate to the root directory of your Speakeasy-generated MCP server project, and create a new file for the HTTP server:
touch src/http-server.tsIn this file, we will set up an Express.js server to handle incoming HTTP requests and route them to the MCP server. First, we’ll set up the skeleton for the HTTP server - a thin wrapper around the generated MCP server. For now, it only requires a single endpoint to handle incoming requests.
import express from 'express';

const app = express();
app.use(express.json());

app.post('/mcp', async (req, res) => {
  // Here, we will handle incoming MCP requests
});

// This GET endpoint is required by the protocol for opening SSE connections
app.get('/mcp', async (req, res) => {
  res.status(405).send('Method not allowed: SSE not implemented.');
})

// Start the server and listen for requests
app.listen(3000, () => {
  console.log('Server listening on port 3000');
});
Note
The MCP protocol requires a GET /mcp endpoint for establishing Server-Sent
Events (SSE) connections. In this example, we return a 405 Method Not Allowed response for this endpoint, as we are not implementing SSE support for the scope of this guide.
Read the MCP Specification for more details.
Start the server with the following command:
# using the project's installation of Bun
npm exec bun -- --watch src/http-server.ts

# or - if you have Bun installed globally
bun --watch src/http-server.ts
This will start the server and listen for incoming requests on port 3000.
Trying to connect to this server with the MCP Inspector will result in an
error, so let’s implement the MCP transport handling logic next.
Handling MCP Client Requests
To handle requests from an MCP client (eg: Claude, Cursor, MCP Inspector, etc),
we’ll need to implement the MCP transport logic in the POST /mcp endpoint.
We’ll accomplish this by constructing an internal MCP server instance, and
connecting it to a transport that can handle incoming HTTP requests.
import { StreamableHTTPServerTransport } from "@modelcontextprotocol/sdk/server/streamableHttp.js";
import express from "express";
import { createConsoleLogger } from "./mcp-server/console-logger.js";
import { createMCPServer } from "./mcp-server/server.js";

const app = express();
app.use(express.json());

app.post("/mcp", async (req, res) => {
  // Key Component #1: Create the MCP server instance
  const mcpServer = createMCPServer({
    logger: createConsoleLogger("warning"), // or info/debug/error
  });

  // Key Component #2: Create the MCP transport instance
  const mcpTransport = new StreamableHTTPServerTransport({
    sessionIdGenerator: undefined, // Stateless - no session tracking
  });

  // Key Component #3: Connect the MCP server to the transport
  await mcpServer.connect(mcpTransport);

  // Key Component #4: Handle the request using the MCP transport
  await mcpTransport.handleRequest(req, res, req.body);
});

app.get('/mcp', async (req, res) => {
  res.status(405).send('Method not allowed: SSE not implemented.');
})

// Start the server and listen for requests
app.listen(3000, () => {
  console.log("MCP server listening on port 3000");
});
Let’s break down the key components of this code:
-
Key Component #1: Create the MCP Server Instance - The MCP Server instance manages the server’s capabilities and handles capability negotiation with clients. It processes resource discovery, tool registration, and routes MCP protocol messages.
-
Key Component #2: Create the MCP Transport Instance - The Transport handles the communication details between HTTP requests and MCP protocol messages. This includes aspects such as headers, status codes, encoding, and streaming. Setting
sessionIdGeneratortoundefinedmakes the implementation stateless - each request is independent with no session tracking. -
Key Component #3: Connect the MCP Server to the Transport - This connects the MCP server to the transport, establishing the bridge between MCP protocol logic and HTTP communication.
-
Key Component #4: Handle the Request Using the MCP Transport - This processes the incoming HTTP request through the MCP transport layer and sends the appropriate MCP response back to the client.
After implementing the above code, the MCP Inspector (and other clients) should be able to connect to the server, list its capabilities (tools, prompts, resources), and even execute unauthenticated tools.
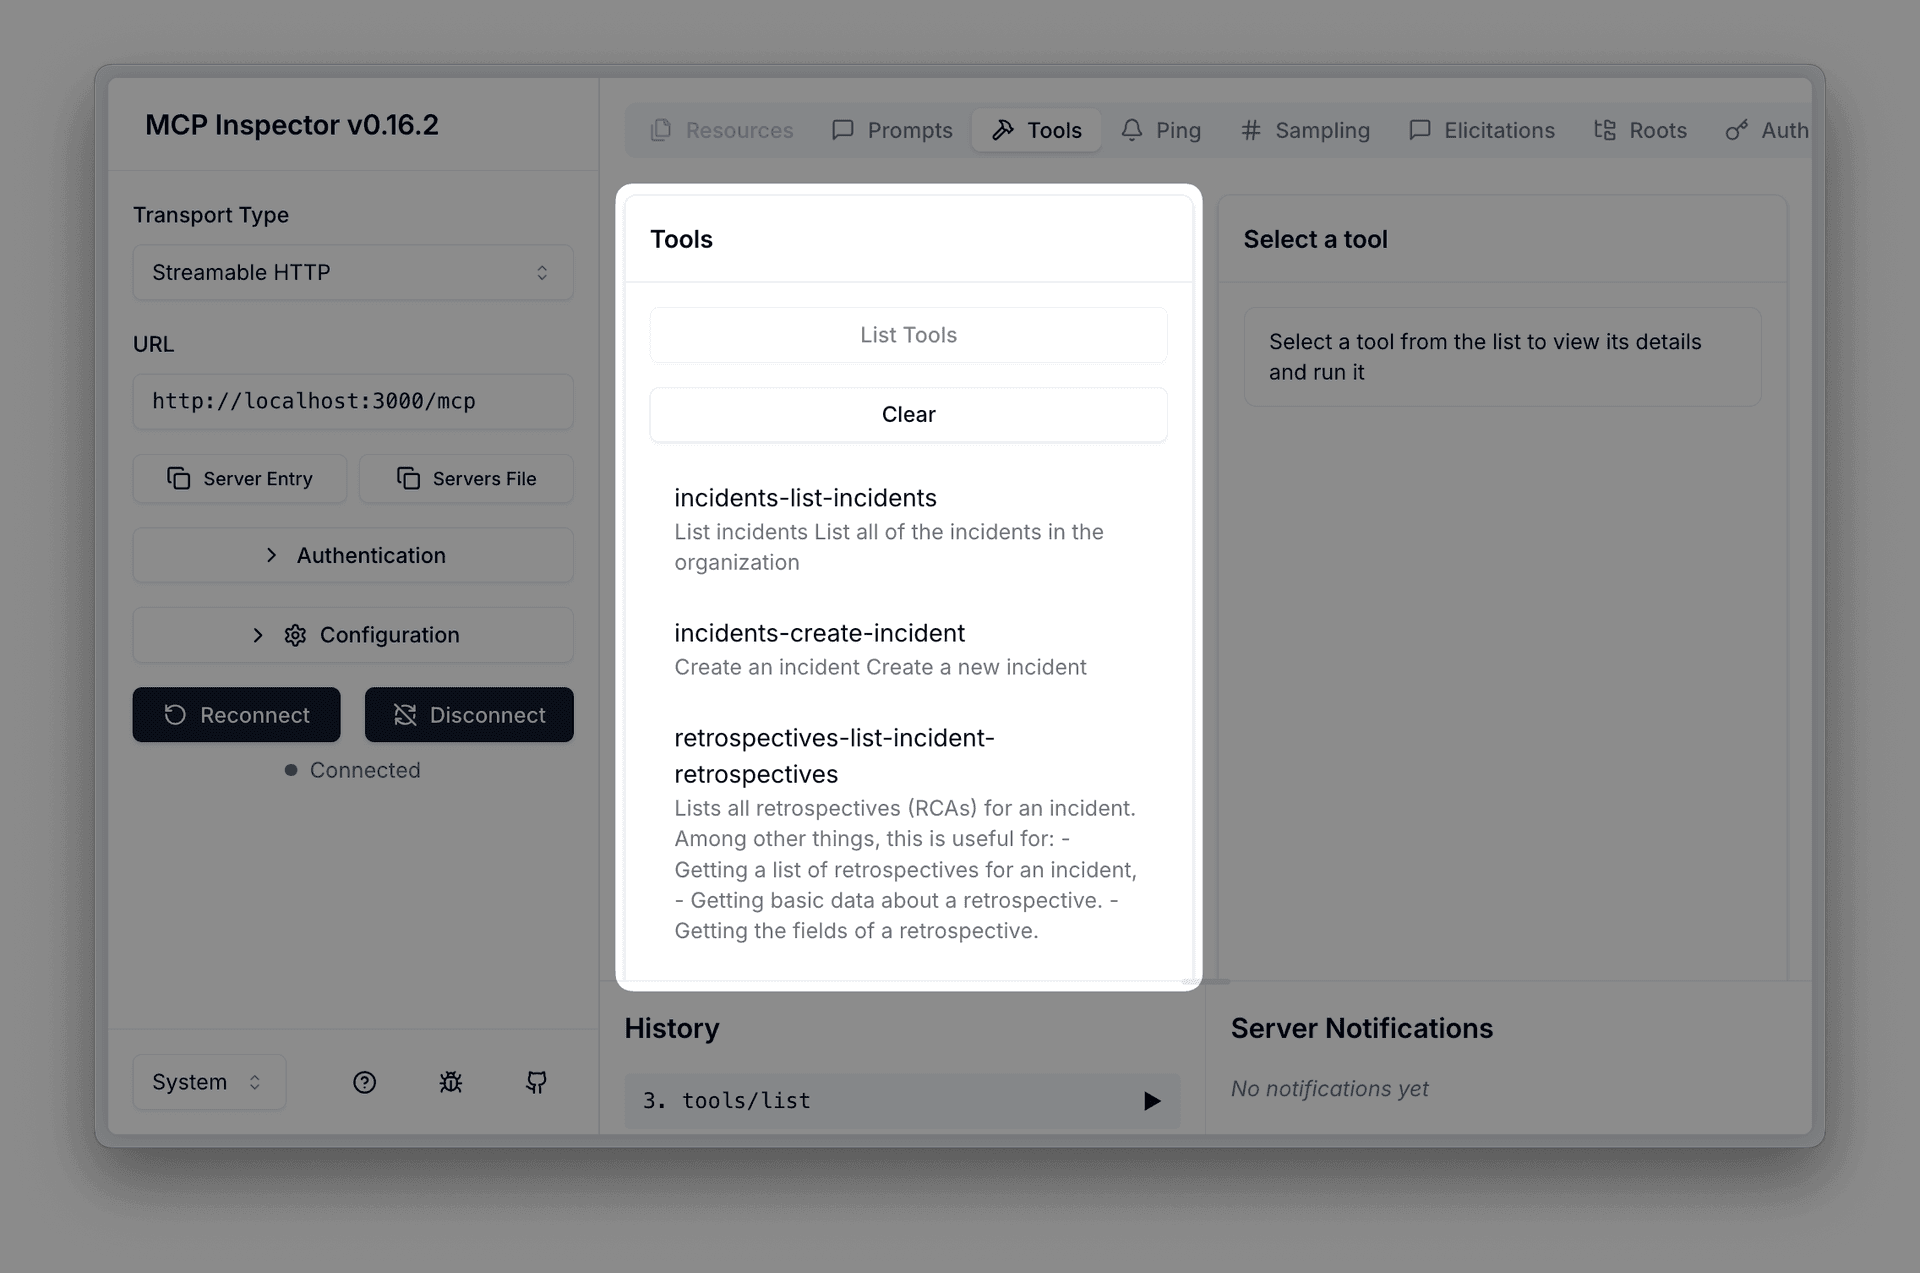
If your MCP server needs to be able to use tools that interact with authenticated API endpoints, keep reading to learn how to accept an authentication header from the client, and use it to authenticate requests to the API.
Adding Authentication Support
Our HTTP server can also accept headers from a client and pass them to the underlying MCP server. This is useful for scenarios where the MCP server needs to authenticate requests to an API.
The following example accepts an Authorization header from the client, and
uses it to authorize the underlying API client, which is used by the MCP server
to make requests to the API.
import { StreamableHTTPServerTransport } from "@modelcontextprotocol/sdk/server/streamableHttp.js";
import express from "express";
import { MySdkCore } from "./core.js";
import { createConsoleLogger } from "./mcp-server/console-logger.js";
import { createMCPServer } from "./mcp-server/server.js";

const app = express();
app.use(express.json());

app.post("/mcp", async (req, res) => {
  const apiKey = req.headers.authorization;

  // Key Component #1: Initialize the generated API client with the optional
  // credential
  const apiClient = new MySdkCore({
    security: apiKey ? { api_key: apiKey } : undefined,
  });

  const mcpServer = createMCPServer({
    logger: createConsoleLogger("warning"),
    // Key Component #2: Pass the API client to the MCP server
    getSDK: () => apiClient,
  });

  const mcpTransport = new StreamableHTTPServerTransport({
    sessionIdGenerator: undefined,
  });

  await mcpServer.connect(mcpTransport);
  await mcpTransport.handleRequest(req, res, req.body);
});

app.get('/mcp', async (req, res) => {
  res.status(405).send('Method not allowed: SSE not implemented.');
})

// Start the server and listen for requests
app.listen(3000, () => {
  console.log("MCP server listening on port 3000");
});
Let’s review the key components again:
-
Key Component #1: Initialize the API Client with the Optional Credential - This initializes the API client with the
Authorizationheader from the request, if it exists. This allows the MCP server to authenticate requests to the API. -
Key Component #2: Pass the API Client to the MCP Server - This passes the authenticated API client to the server, so calls can be made to secured API operations.
Now, when the MCP Inspector (or any other client) connects to the server, it
can include an Authorization header with an API key or token. The MCP server
will use this header to authenticate requests to the API client, allowing it to
access secured operations and resources.
Note
This pattern can be used further configure the API client. For example, an
X-Env header could be sent to the server from the client, which can be used
to select the serverUrl to use for the API client (eg: production or
sandbox):
const serverUrl = req.headers["x-env"] === "sandbox"
  ? "https://api.sandbox.acme.io"
  : "https://api.acme.io";

const apiClient = new MySdkCore({
  security: apiKey ? { api_key: apiKey } : undefined,
  serverUrl: serverUrl,
});
Last updated on